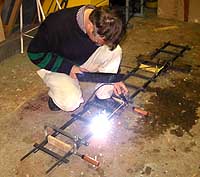
 Making a straight piece of iron sleepered track is really easy: Just clamp a few pieces of wood cut to exact gauge size between the rails, slip the sleepers (cut from band iron) under the track and go ahead with the welding stick!
Making a straight piece of iron sleepered track is really easy: Just clamp a few pieces of wood cut to exact gauge size between the rails, slip the sleepers (cut from band iron) under the track and go ahead with the welding stick!
 However, curved tracks and turnouts are quite another matter - a template is necessary. Using the computer, I calculated the displacement of the curved rails at each point on a 10 cm grid, and marking it all up on a large piece of chipboard I was able to get the accurate arcs needed. Using woodscrews, I could get the pre-bent rail in the right position for welding.
 Here the work is in progress on a turnout. The frog piece is still missing, but will be added shortly. The switch points are not hinged, they are springy enough to bend easily. Stoppers will be added to the sleepers (6 mm Allen-head screws in tapped holes) so the point rails won't spread outwards when a train is passing.
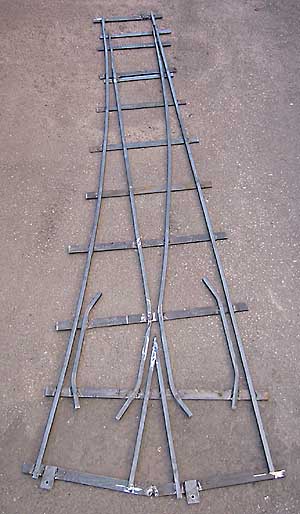 The switching mechanism with levers and other stuff is not yet ready - I'll add a picture or two when it's done. Also, I'll weld one more sleeper under the frog's sharp point, it's a bit springy as is. At the same time, I'll move the left guard rail a bit backward, so it coincides better with the frog. Note the rail fasteners: a lug on each end will attach with an M6 screw to a tapped hole in the following piece of track.
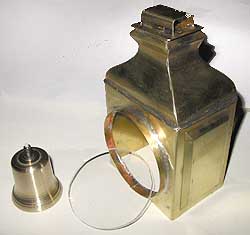 Some decorative work: the bell and the huge lantern - in real real size it's over 1 meter (3 ft) high! The bell is turned from solid, the lantern is made from 0.3 mm brass, soft soldered. The "lens" is a piece of 4 mm acrylic, cut to size on a small bandsaw.
 Add some paint, and a reflector from a cheap flashlight bought and slaughtered for the purpose, and a decorative lantern is born! Back in the 1800s, the lanterns were often the most heavily decorated part of an American locomotive, sometimes with real landscape oil paintings on the side panels (see the Lilly Belle's lantern on Walt Disney's railroad page).
Still to be added: Batteries and flashlight bulb inside...
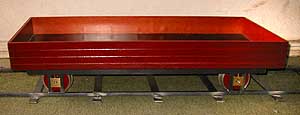 ... and just to show you one more thing: I'm working on a couple of flatcars, for passengers. The wheels are turned from solid 100mm steel bar, a rather natural choice - the workshop and I got dirty enough from the graphite in the cast iron of the loco and tender wheels...
Close this window when you are ready...
Any information presented on this website (especially any do-it-yourself instructions) is given without any acceptance of liability for damage or injury - so, always remember: SAFETY FIRST!
The material on this page and its related pages is Copyright © 2001-2007 by J-E Nystrom. You may NOT copy, transmit and/or publish any of my images or texts in print, electronically, on your own website or in any other way. The author retains all rights to this work, with this sole exception: Storing the pages on your own computer or printing out a paper copy, for your own, strictly personal use is allowed.
You may, however, freely link to the "Building Live Steam Locomotives" page at: http://www.saunalahti.fi/animato/steam, or to my Animation Home Page at: http://www.saunalahti.fi/animato. You should NOT link directly to THIS page, since it's address may change in the future. Also, you may not put any of these pages or pictures into "frames" on your own website.
Thank you.