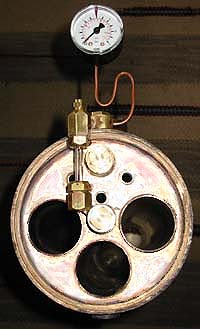
The design used by Kozo Hiraoka for his 3 1/2" gauge Shay was simple to scale up to fit my smallish boiler - here's a shot of the gauge attached to the backhead.
Note that the lower fitting's top is at the lowest permissible water level (10 mm above flue tops, or crown sheet height in a conventional boiler), and the upper fitting's lower edge is at max. water level. So, if you see both water and air in the gauge, it's OK. If not, then you need to do something in a hurry...
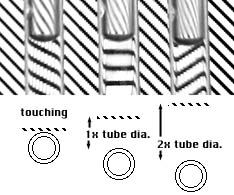
Here is a little visual example of the discussion recently held on the groups, of how to make the water level more visible in the glass; put a diagonally striped background 1 or 2 tube diameters behind the glass, and you'll be able to see the water level much more clearly than without this aid!
These are actual, unretouched photos of a 6mm (1/4") dia glass tube half filled with water, shot against a diagonal pattern on a laptop computer screen. Making the pattern just about as wide at the tube, there will not be a distracting background (as here, for demonstration only), and the water level will show still more clearly...
This is the right way to cut a glass tube to correct length: First, file a little notch (just a scratch, really) at the point where you wish the tube to be cut, then wrap your forefingers around the tube at the points indicated on the drawing, and apply pressure opposite the notch with both thumbs; the glass will snap very cleanly. I've done this routinely with bare hands (I studied chemistry, and had to make my own lab glassware), but I suggest you use thin leather gloves, just in case...
After the tube is cut, there's still one very important thing to do: anneal the ends! Insert the newly cut end slowly into a propane flame, so that the glass heats gradually, and keep it there until the flame turns bright orange at the tube's end, and the glass edge melts ever so slightly, giving a nice, smooth, rounded edge. A few tries will get it perfect. Annealed this way, the glass will not break or chip very easily.
I have also solved most of the problems with the track - especially on the gravel... Can you guess how? Wooden sleepers! Unorthodox, eh? ;-)
22x50x300 mm pieces of wood, just loosely inserted under the track's iron sleepers, are high enough to prevent the welded, low-profile track from sinking into the gravel.
Surprisingly, the 4 % grade (at the point in the video where the loco enters the gravel walkway), was negotiable if you built up some speed ahead of time. With a light hand on the throttle, I was able to pull a train with myself and one adult passenger up the grade without slipping the drivers...
But just you wait 'til there's 7 bars of steam in the boiler - I'm really amazed at the pulling power you can get from this little engine...
Close this window when you are ready...
Any information presented on this website (especially any do-it-yourself instructions) is given without any acceptance of liability for damage or injury - so, always remember: SAFETY FIRST!
The material on this page and its related pages is Copyright © 2001-2007 by J-E Nystrom. You may NOT copy, transmit and/or publish any of my images or texts in print, electronically, on your own website or in any other way. The author retains all rights to this work, with this sole exception: Storing the pages on your own computer or printing out a paper copy, for your own, strictly personal use is allowed.
You may, however, freely link to the "Building Live Steam Locomotives" page at: http://www.saunalahti.fi/animato/steam, or to my Animation Home Page at: http://www.saunalahti.fi/animato. You should NOT link directly to THIS page, since it's address may change in the future. Also, you may not put any of these pages or pictures into "frames" on your own website.
Thank you.