
At left is the new burner assembly (close-up below). The long cone of stainless netting is the same I experimented with earlier, but abandoned because the pokers were so promising... If there's the same burnout problem with this netting as with the pokers, they are at least quick and easy to renew! Building three new slotted pokers entirely from scratch is a major undertaking - 300 slits have to be sawed into stainless steel tubing! (I lost more than one slitting saw when I did that the first time...)
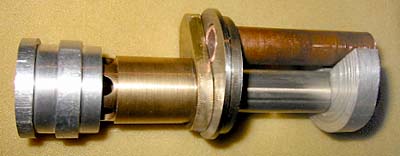
I used the same burner valves, nozzles and venturis as before, but have added an adjustable and lockable sleeve over the air inlet holes - with this I can get the correct air/propane mixture. The aluminum spacer at right is also added (to keep the burner aligned in the flue), and I've replaced the piezo spark plug with a copper "ignition tube". I don't fear burnout of these parts, since they will not be in contact with the flame.
There were severe problems iginiting the old pokers with the piezo sparking devices: First, the spark didn't always ignite the gas on the first try, causing poofs and even loud bangs on subsequent tries! Second, after some use, the intense heat had distorted the burners and the spark plugs so that I got no spark - in one burner the plug was even short-circuited! In the end, I had to use a fireplace lighter, poking its flame into the burner's air openings - with varying success and many bangs and booms...
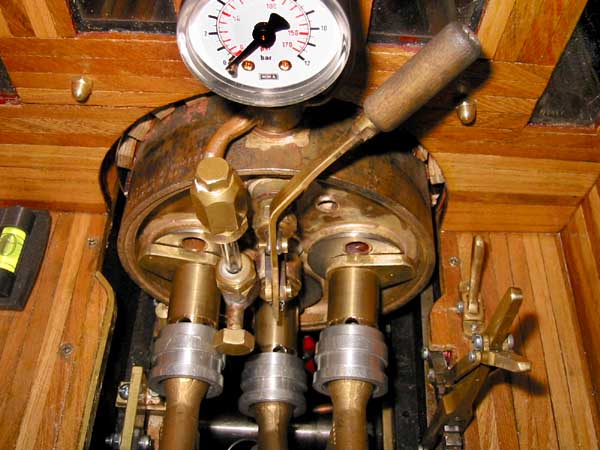
Here the new burners are installed in the backhead. A few cosmetic changes can also be seen: I've put veneer strips on all inside surfaces of the cab, and exchanged the bubble level from a circular to a rectangular one. I also improved the spring latch of the reverser and added a blow-out valve for the water gauge glass.
Note the ignition holes above the burners - they have flaps that can be turned to cover the openings when the burners have been lit. The flaps have an internal click-stop mechanism, utilizing the classic "spring and ball" to secure them when in the closed position.
I now have a sure-fire method of igniting the new burners : I push a lit party sparkler deep into the copper ignition tube so that it protrudes well in front of the burner nozzle inside, and turn on the gas! It has worked everytime I've tried it: After a few "plops" the flame stabilizes and the netting starts to glow. I then pull out and discard the spent sparkler, and close the flap to the ignition tube.
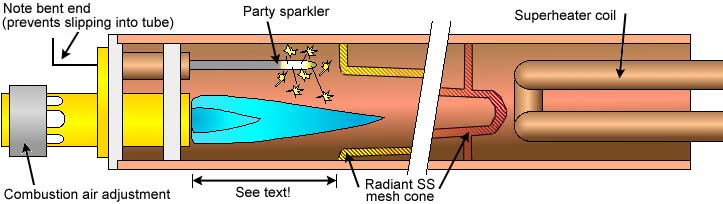
Note that the distance between the burner and the mesh cone needs to be large enough - originally, I had placed the cone very close to the burner, but this caused the flame to ignite and burn in the smokebox end of the flue, even protruding into the smokebox itself. Not good! There has been no more such problems after I shortened the cone a bit, so that the distance between the nozzle and the wide end of the cone is around 100 mm (4").
Close this window when you are ready...
Any information presented on this website (especially any do-it-yourself instructions) is given without any acceptance of liability for damage or injury - so, always remember: SAFETY FIRST!
The material on this page and its related pages is Copyright © 2001-2007 by J-E Nystrom. You may NOT copy, transmit and/or publish any of my images or texts in print, electronically, on your own website or in any other way. The author retains all rights to this work, with this sole exception: Storing the pages on your own computer or printing out a paper copy, for your own, strictly personal use is allowed.
You may, however, freely link to the "Building Live Steam Locomotives" page at: http://www.saunalahti.fi/animato/steam, or to my Animation Home Page at: http://www.saunalahti.fi/animato. You should NOT link directly to THIS page, since it's address may change in the future. Also, you may not put any of these pages or pictures into "frames" on your own website.
Thank you.