FINDER RETICLE Page 2
NOTE: This information, and the downloadable Field Guides
are Copyright 1996 ANI-MATO J-E Nystrom, and may NOT be published or distributed in any form. You may only publish this webpage address.
Now, when you have the file of the field guide you chose
for your reticle, you need to make a film clip out of it. You have three
options:
- Make a lith negative of the field guide / shoot the negative
with underneath lighting / use normal film processing.
- Print out a paper negative / shoot it / use normal film
processing.
- Print the field guide on paper / shoot it / reversal
process the film.
The raw film stock to use is "Eastman High Contrast",
a black & white stock which is used by film labs and optical houses.
If you ask nicely, you should be able to buy a 30 meter reel of it... (They'll
have to spool it for you, since it comes only in 300 or 600 meter cans!)
You can process short clips of High Contrast yourself
in an ordinary photographic paper developer & fixer. You can handle
this stock in red darkroom light. This enables you to make quick tests,
as well as the final reticle.
If you can obtain a lith negative of the field guide by
printing it on a photosetter, or by copying from a paper print in a repro
camera, you'll get the best quality. An inversed (negative) paper print
will do, but the reticle will not be as sharp as with a lith negative.
The last option is to shoot from an ordinary paper print,
and process in reversal chemistry. This processing is best done by a film
laboratory.
The end result will be a film clip with a transparent
background, and the field guide's lines in black.
In order to get your reticle as exact as possible, you
need a loupe with a "measuring reticle". Film labs usually have
a few (try to borrow one if you develop the clips yourself), or you can
buy your own from an optician's store, or by mail from Edmund Scientific
Co. in the US. I recommend their "6X Pocket Comparator" with the "multi-scale reticle", item # A41,055. It costs almost US$ 100 + shipping, so it is not exactly cheap, but it's of excellent optical quality, and is useful in many other ways, too. For instance, with it you can check that your image is at right angles to the film edge... If you can't borrow one, or do not wish to spend a lot of money on "just a magnifier", you can use a sliding measuring caliper, or just a transparent ruler with close enough divisions (0.5 mm), but this is of course not as exact as the special measuring loupe.
So, let's start by putting the camera on a suitable stand, absolutely
perpendicular to the field guide you're going to shoot. Light the guide evenly (from behind if you use
a lith negative), and position the camera so that the image just fills
your camera finder, and focus the lens precisely. Shoot a short length of High Contrast stock. It's speed
is only around 6 ASA/ISO, so adjust your exposure meter accordingly! Use
the lowest speed on your camera, or shoot single frames. (You can build
your own single frame motor, as you've seen on my other pages...)
NOTE: High contrast stock has no
black backing, so you must load/unload in almost total darkness, or in
red darkroom light! If you try to load in ordinary light, you'll fog quite
a few meters of film! So after shooting, cover any windows, switch off
all lights, open the camera door, and being VERY CAREFUL not to move the camera, cut the film below the lower sprocket
and put the reel in a can. Don't forget to close the camera door again
before switching on the lights!
Develop this clip of film, and use the loupe to measure
the width of the image of the field guide. Don't be surprised if the image
of the field guide is too small - very few cameras have viewfinders showing
exactly what is going to appear on film... This is just the first test,
and you'll be correcting for the error later. (If the whole image of the
field guide is too large and does not appear completely on your film, you
need to reshoot at a farther distance, correcting for your viewfinder's
error.)
SMPTE STANDARD APERTURES:
(SMPTE = Society of Motion Picture and Television Engineers)
REFERENCES:
ANSI/SMPTE 7-1988, ANSI/SMPTE 59-1991 and SMPTE 201M Standards,
published in the SMPTE Journal, Feb. 1989, March 1992 and Sept. 1995 respectively.
A 16 mm image should be 10.26 mm
wide, 7.49 mm high.
(If you used the combined 16/S-16 guide, and you see part of the two rightmost columns on your film clip,
ignore that. Just measure from the left edge to the thick line representing
the right edge of the standard 16mm frame).
A Super-16 mm image should be 12.35
mm wide, 7.49 mm high.
A 35mm, 1:1,35 ("Academy")
image should be 21.95 mm wide, 16.0 mm high.
The 35mm "full" aperture should be 24.92 mm wide, 18.67 mm high.
Divide your film clip's measured width
by the standard width listed above.
Since your image on the clip most probably is
smaller than the standard, you'll get a number smaller than one.
Measure the distance from your camera's
front lens to the field guide. Multiply this by the number you just got.
Lower your camera to this new distance. Shoot and develop a new clip. Again, be VERY careful not to move the camera when unloading.
Check the new clip. You are now
so close to the right result, that even a small error in framing will cut
off part of the field guide's image on the film. If necessary, reshoot
again, correcting for the clipping of the image - it is pretty easy to
estimate how much to move the field guide.
Reshoot and develop again. Measure.
Correct for errors, reshoot and develop...
You get the idea!
In a few tries, you'll have a film
clip with almost exactly the right image size, and the whole field guide
in view. Shoot 10 meters when you've found the right camera/subject position
and distance. You can then donate lots of short clips to all your friends
who also want to have a perfect viewfinder reticle!
How to install the reticle:
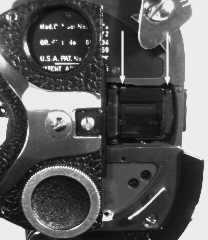 Here you see the front of the Bolex camera with the turret
rotated to reveal the reflex prism, on top of which is attached a metal
aperture mask with two small screws (arrows). The prism is on a hinge and
swings out for cleaning (and closer study!). Remove the mask by unscrewing
these two small screws - the right one is easy to remove, but the left
one is tricky, without dissassembling the camera further. You need a small
watchmaker's screwdriver, and tweezers to get to that second screw even
when the prism is swung out.
Here you see the front of the Bolex camera with the turret
rotated to reveal the reflex prism, on top of which is attached a metal
aperture mask with two small screws (arrows). The prism is on a hinge and
swings out for cleaning (and closer study!). Remove the mask by unscrewing
these two small screws - the right one is easy to remove, but the left
one is tricky, without dissassembling the camera further. You need a small
watchmaker's screwdriver, and tweezers to get to that second screw even
when the prism is swung out.
You must also remove an additional mask in the finder
ocular: Remove the top cover of the finder tube (4 small screws) and look
into the eyepiece - you'll see a round metal masking plate with three prongs.
This slides right out from the tube it is in, so it is easy to remove.
Warning! Don't touch the screws of the right angle
prism in the front end of the finder!
By removing the two masks, you have enlarged the image
in the finder so that it is in fact LARGER than the actual film gate aperture,
so now you must attach the reticle to the ground glass prism to get accurate framing.
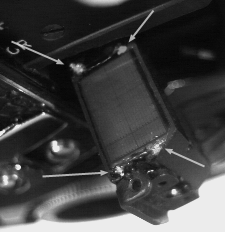 Here you can see how to attach the reticle with
4 minuscle drops of white glue (arrows). Don't use
"Super Glue", since it will fog the prism! White glue
is easy to clean off with a moistened cotton swab if you have to redo the
attachment.
Swing out the prism. Put the clip (perforation edge cut away) loosely on the prism, emulsion side up (reversed left to right, top of reticle towards outer edge of prism). Estimate the correct position from the photo. Attach the clip with white glue, applying it by dipping a needle in glue, and transfer a minute drop to each reticle corner. Since white glue dries
slowly, you can still adjust the reticle's position for a minute or so.
Here you can see how to attach the reticle with
4 minuscle drops of white glue (arrows). Don't use
"Super Glue", since it will fog the prism! White glue
is easy to clean off with a moistened cotton swab if you have to redo the
attachment.
Swing out the prism. Put the clip (perforation edge cut away) loosely on the prism, emulsion side up (reversed left to right, top of reticle towards outer edge of prism). Estimate the correct position from the photo. Attach the clip with white glue, applying it by dipping a needle in glue, and transfer a minute drop to each reticle corner. Since white glue dries
slowly, you can still adjust the reticle's position for a minute or so.
How to get it in exactly the right position? TRIAL AND
ERROR is the keyword here. With a Bolex, it is rather easy, since you can
look through the reflex prism (swung back into the camera again!) and see
both the film gate and the reticle, provided you shine light into both
the finder ocular and the gate. (Of course, you need to remove the pressure plate from the film gate. To get the shutter to open, set the I/T knob to T and press the side release forward. Also adjust the brightness of each light so
that they balance.)
You can then use a needle point to push the reticle into
a position that makes its image coincide with the camera gate's aperture.
This requires a steady hand, since ideally, you should get it into the
right position within less than 1/10 of a millimeter, to comply with the
SMPTE standard... NOTE: The camera aperture may be a little larger than
the standard, but this is normal. The sizes mentioned are the NOMINAL sizes
of the camera aperture.
Don't despair if you can't do it the first time. You've
got plenty of film to cut new clips from! The white glue comes off the
prism easily: use a cotton swab moistened in water if the glue is still
soft, or alcohol, if the glue has dried.
If you want to ensure that you've got the reticle correctly
installed, shoot the original field guide so that its lines coincide with
the finder reticle's lines. Develop the film, and check that the image
on film is in the right size and position, parallell to the film edges, etc. If necessary, remove the clip & dry glue, and try again!
GOOD LUCK!
Previous Page