 I had planned to make the eccentric straps from cast iron, but got another idea (which I'm sure you can't even guess ;-): Make them from key stock...
I had planned to make the eccentric straps from cast iron, but got another idea (which I'm sure you can't even guess ;-): Make them from key stock...
This may sound crazy, but since 6x6 mm stock is easily forged with a propane flame by just bending, no hammering needed, I decided to try it!
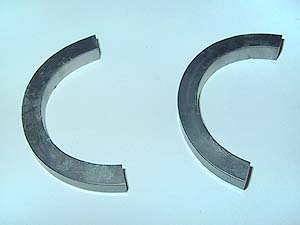 Having thus formed the bar to suitable radius, I cut the two pieces needed for each eccentric. In addition to these, I cut four short pieces for holding the straps together with screws.
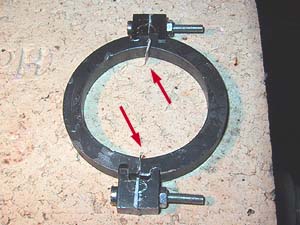 Here I've placed all the pieces for one strap on a fireproof brick, ready for silver soldering. Note how I've ground a rough indentation for the fastening pieces into the halves. This will greatly increase the strength of the join. I used a narrow grinding disk to cut the recesses, since precision is not needed here - the solder will fill the gaps. But how can I avoid the two halves from being soldered together permanently? Simple: pieces of paper are inserted between them, at arrows!
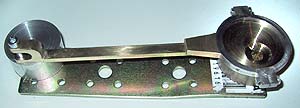
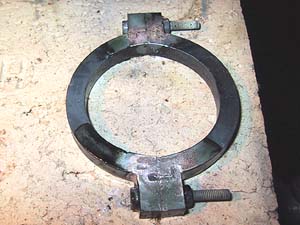 Here the soldering is completed. The paper has carbonized, forming a layer between the halves that enabled me to separate them easily. To finish the eccentric strap I still added a fastening tab for the eccentric rod, and finally turned the inner diameter and thickness to the correct dimensions. Four are alltogether needed, two on each side of the loco.
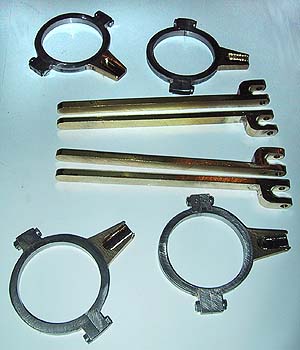 On the left are the parts for the four eccentrics - I used both steel and brass... Still to come: Lubrication for the straps - since I didn't make them from cast iron, I'll make small brass oil cups and attach them to the straps...
I also made this quickie jig to enable me to silver solder the eccentric rods to the straps and get all to exactly the same length. Note that the jig is adjustable - by rotating the pin holder at left, I can set the distance. (Tightly screwed in place when soldering, of course!)
I tested the assembly by attaching a hand crank to the axle - this animated gif is composited from 12 digital shots, with the crank turned 30 degrees between every picture (the "movie" is a bit grainy because it is a gif-type image, with only 256 colors - note that it will take a while to load, and then loop by itself):
You can see part of the crank in a few frames at lower right. The loco frame is upside-down here, if you're wondering - the reverser is set to full forward gear.
One side of the assembly is put together in the wrong way, forward & backward eccentrics are not mirror images of the other side. Also, the eccentric angles are just approximated by eye - all this I will naturally correct when I do the final assembly - but I wanted to see the "action" immediately...
Close this window when you are ready...
Any information presented on this website (especially any do-it-yourself instructions) is given without any acceptance of liability for damage or injury - so, always remember: SAFETY FIRST!
The material on this page and its related pages is Copyright © 2001-2007 by J-E Nystrom. You may NOT copy, transmit and/or publish any of my images or texts in print, electronically, on your own website or in any other way. The author retains all rights to this work, with this sole exception: Storing the pages on your own computer or printing out a paper copy, for your own, strictly personal use is allowed.
You may, however, freely link to the "Building Live Steam Locomotives" page at: http://www.saunalahti.fi/animato/steam, or to my Animation Home Page at: http://www.saunalahti.fi/animato. You should NOT link directly to THIS page, since it's address may change in the future. Also, you may not put any of these pages or pictures into "frames" on your own website.
Thank you.