Welcome
EazyCNC

jDraft 2.0


PureJavaComm
PIC CDC ACM
Weather
Ten-Buck Furnace
H8S Bootloader
Camera Calibration
Multitouch
Myford VFD
Fun with HC08
bl08

printf II

Java Goes Native
Densitometer
printf

jApp

Igloo

New Furnace

New Furnace
Part II

Linux 101

H8S/gcc
Quickie
Gas Fired Furnace
Down Memory Lane
Exlibris
Wheel Patterns
Glitches
CHIP-8
eDice

Animato

jDraft
JNA Benchmark
Contact Info
a Gas Fired Furnace
The Glint in the Fathers Eye
In the spring on -98 I started seriously thinking about acquiring facilities for making small castings. During the spring I tried to gather information about the necessary equipment and suppliers for them. Started by getting copies of "The Backyard Foundry" and "Foundry Work for the Amateur" Aspin. These provided a wealth of information on the subject and addresses of suppliers, albeit all located in UK. With help of the yellow pages I managed to track Finnish suppliers for those things I couldn't possibly manufacture or did not consider interesting enough to do-it-yourself.The Furnace
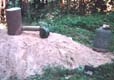
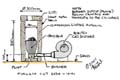
Spring of -99 saw me buy from Linema a number 8 graphite crucible, 50 kg of commercial refractory lining, 50 kg of oil sand. I also bought a leather apron and full face poly carbonate mask along with long Kevlar based fireproof gloves. A trip to a local coal burning power station produced some +100 liters coal. While there I picked up, from a dump pile, some discarded sheet metal that I later used for the wrapper/former of the furnace. I also picked up some scrapped boiler firebox refractory lining that I meant to grind to create 'grog'. The grog was to be used to try manufacture lining by mixing it with fire clay. Unnecessary of course, as I had bought the refractory material, but I just could not resist having a go. This I later abandoned because I could not grind the harder than rock firebricks at all. Tough luck (a pun intended).One evening I wrapped the sheet of steel into a cylinder of 30 cm in diameter and about 50 cm high. This was the outside former for the lining. For the inside former I cut 10 disks from a 50 mm Styrofoam that I glued together to form a solid cylinder 18 cm in diameter and x 50 cm high. At this stage I realized that I had made the internal former a little bit too small so I wrapped a few rounds of corrugated paper carton around it. This proved to be not so good idea as the paper soaked and softened while the lining was rammed into the space between inner and outer former, which resulted in fluted inside surface for the lining. Not a catastrophe but I think I would have been better of without it. When the lining had hardened the inside former was dissolved with thinner.
Another mistake was that I could not really make up my mind whether to go for gas or coal fired furnace. From what I had read and heard I had the idea that solid fuel would be more likely to produce enough heat than gas firing. A lot of people doubted weather one could at all melt iron with gas firing without oxygen. At about this time an article in Model Engineer (ME1999 No4095) reported of a guy who successfully melted iron using a big Sievert (by judging from the images) torch and a blower. Somehow this convinced me to make the inlet (tuyere) on the side of the lining to be big enough for that kind of burner and to make the inlet tangential to cylinder to create vortex kind of flame.
The Mark I burner


Next I tried to buy the torch/burner, which I had figured out to be Sievert 3278. However nobody seemed to be interested in selling this to me without a handle and all the fittings, and it seemed a bit too much to pay 800 FIM (130 USD / 100GBP) for a set, most of which was unnecessary. So I tried to copy the design to the best of my ability. The burner is about 100 mm long and has a diameter of about 50 mm and has no holes for air inlet. At the inlet side there is a mixing chamber that works with the venturi principle. The gas rushes in from a hole of about 1.8 mm (must have digged that out from some brochure or something) and the air is sucked in through six D 8 mm holes on the sides of the chamber. I mounted the burner with three bolts in the center of a 100 mm x 500m stainless steel pipe that penetrated the lining of the furnace. To the other end of the pipe I loosely pushed a 12 Volt discarded truck cockpit air blower. It draws about 3 amps so its a 40 Watt thing. The gas inlet was connected to an 11 kg propane bottle using a high pressure (max 2 bar) regulator (not that I think it regulates anything, IMHO). When tested in free air the burner produced a nice and powerful (I thought) about 75 cm long blue flame.
First Attempt (Melt 1)
So off I go, assembled all the gears at the back yard on top of a sand pile. Put some paper in the furnace, set them on fire and opened the gas valve...wooooch the burner started and I turned on the blower and put the lid on the furnace. Full of hope I inserted a length of concrete reinforcing steel rod through the exhaust in the lid and set back to watch, as the rod would gradually sink into the furnace. About an hour later I was still watching and the rod, when lifted, had only reached the color of a fire engine. So I started playing with the gas regulator and the draught by cutting of some of the air input. No matter what I did I just could not raise the temperature. So back to the think tank.Melt Down! Staring Mark II (Melt 2)
I figured out that maybe the anti-gas folks had it right and decided to have a go with coal. Had I understood what I had read I would have made an effort to get coke (not coal) or anthracite. As Terry Aspin writes in the typical British understatement style "It is well worth the trouble...to obtaining ... furnace coke". Anyway, made a grate from steel reinforcing rods, inserted a crucible and filled the rest of the furnace with coal. I lit up the fire via the tuyere with a propane torch and then blasted air with the blower. For the first 15 minutes or so most of the burning took place on top of the furnace as (I guess) all the volatile gasses from the coal evaporated (to avoid this you want coke or anthracite) but then the burning retreated back to inside the furnace and within 20 minutes I had white heat and the pieces of brake drums in the crucible started to melt. But pretty soon the fire seemed to cool down and I figured (rightly) that I had burned all the coal. Time to recharge (which is why I think a solid fuel furnace is not so nice), so I switched off the draught, packed the remaining coal very tight and topped up with new coal. Switched on the draught and then nothing! The fire did show some sign of improving but the draught was nowhere near what it had been and the crucible started to show signs of cooling and the iron solidifying.So to save the crucible I lifted it away from the furnace and tipped it upside down on the sand in the hope that the iron would contract faster than the crucible and drop out. In the morning the iron lump had indeed dropped from the crucible and the crucible was saved, which was nice. The post mortem showed that the grate had melted and the burnt coal and ashes had filled the bottom of the furnace blocking all draught. My conclusion was that when the draught was cut off the cooling that the draught had provided stopped and the white hot coal easily melted the 10 mm steel bars. Bigger steel bars and faster refill would probably have cured this problem but further analyses of the situation convinced me that there really was too little volume for fuel in this furnace for practical solid fuel firing. With number 8 crucibles there is only about 1 cm space between the lining and the crucible.
A positive out come from this experiment was that the lump of iron that I recovered from the crucible was easily cut and machined beautifully, which is of course one of the key requirements when casting iron.
Wonders of Modern Information Technology: Enter Mark III burner!


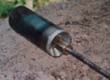
Then a new turn developed as, while surfing in the net, I came across Rob Reil's monster burner. This at once convinced me that a gas firing was the way to go and I quickly acquired a 50 mm (2 inch) black iron water pipe and 75 mm to 50 mm ( 2" to 1 1/2") reducer bell to fit. I rejected the Ron type of mounting the gas nozzle and instead just put a 7 mm brass pipe across the bell mouth via two wholes drilled trough the walls. Two retaining screws in tapped holes hold the pipe in place. A 1.8 mm hole was drilled into the middle of the pipe to serve as the gas nozzle. The other end of the pipe nicely fitted to the inside diameter of high-pressure gas tube and the other end to a surplus pressure gauge that I happened to have on the shelve.
A slight problem was that the 50 mm burner was a loose fit to the 100 mm opening in the furnace. I solved this by concocting a reducer fitting from fire clay/plaster. This was a bit fragile but I figured that it would do the job.
Loosing it! or My First Ever Casting (Melt 3)
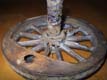
When tested within the furnace (this type of burner where there is nothing (i.e. a flare) to slow down the gas flow blows out in free air) it gave most a satisfying and convincing sound; in minutes the flutes (see above) inside the furnace were gloving orange red! So I filled the crucible with what scrap I could find, I think it was a cast iron pipe from some ancient agricultural device and fired away. I quickly located THE old wheel pattern and made a green sand mould from oil sand. Somewhere along the way I had also acquired 33 kg propane bottle and turned a plug to tap the gas. So I put some burning paper into the furnace turned on the gas very carefully...with camooch the burner started and I put the lid on. I let it warm up for 10 minutes at gas mark one (i.e. about 0.5 bar) and then turned the valve fully open, which showed some 3.5 bar at the burner inlet. All the time I had a very good feeling that this was it. And yes after about an hour (I was too exited to make proper notes or bother with taking photos, besides I did not have the wonderful DIGITAL IXUSThe summer of -00 went by without much foundry activity, what little time I had was misspent in experimenting with the pattern making for the loco and going from 7.25 " gauge to 5" gauge and back. So progress during that year was pretty much nil, except that we (Jankke and I)visited the Jokela foundry where they still pretty much operate in the time honored way. From there we picked up some 100 L of ready tempered green sand and 40 kg of 4% carbon iron, all at very nice price. By the end of summer Jankke had got his 3003 wheel patterns ready. I bought a commercial regulator high pressure (max. 4 bar) with pressure gauge and safety shutoff for the 33 kg bottle. Thought it prudent to have safer equipment now that Jankke was involved! All autumn we waited for suitable weather and time, which never came.
The First 'For Real' Attempt (Melt 4)
(Captain's log star date 5.6.2001)

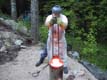
This spring (of -01) finally saw Jankke and me ready for action. Both Jankke and me having patterns ready for molding all the ingredients we needed seemed to be there. One beautiful Thuesday evening we set to work; Jankke prepared two frames from his patterns while I set up the furnace. We charged the crucible with about 4 kg 4% C iron that we had acquired from Jokela and added 1.5 kg of free machining steel scrap to bring down the carbon content. Lighted up the fire at 18:15 and over two hours and 21 kg of propane later I poured the molds while Jankke held back the dross. My wonderful neighborough Pekka, from whom I BTW had at the last minute borrowed a spare 33 kg bottle, (he has got everything you can possibly need), dropped by and managed to record the whole process on film, sorry, on silicon of course.
Two pizzas and pepsi maxes
Some weeks passed while I pondered on this failure. Obviously one big mistake was to forget venting and provide for risers in the mould. We asked for help in model engineering mailing list and got a lot of response for which we are thankful. The suggestion ranged from it-can't be done, to preheating the air, using a blower to force draft instead of the venturi principle or acquiring and applying pure oxygen. In the end my conclusion was that what went wrong was mainly two things, a) we had used the high carbon content iron instead of scrap gray iron and b) the heat had not been sufficient. This I attributed to the leak between the furnace lining and burner, visible in the images. Investigation of the burner hot end and the reducer piece that I had made of fire clay revealed that some melting of steel had occurred at the end of the burner pipe and that the fire clay had actual melted and trickled away into the furnace bottom. So I concluded that the main problem was not temperature as such but the wrong kind of metal and the leaking in of too much cooling air, which we had compensated with high volume of gas, which resulted in poor combustion inside the furnace. The high gas consumption (21 kg of propane to melt 6 kg of iron/steel) was a clear indication of that, I think.
And the Finalist is Mark IV

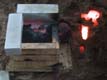
Further thinking and re-reading of Ginery's "Gas Fired Crucible Furnace" that I had acquired during the spring and also some comments from the mailing list made me think that while I had had some success with the venturi-only type burner, and others have reported it in the net, maybe experiments along the Gingery lines would be rewarding. So I adapted the original blower to provide forced draft and increased the gas outlet orifice from 1.8 mm to 3 mm. I figured this would give slower gas flow at lower pressure but without decreasing the total amount of gas. This would allow more time for the gas mixture to burn inside furnace where it is needed and not outside the exhaust, which was what was happening and is evident from the pictures. I also sealed the burner pipe to the furnace lining with high temperature industrial fireclay so that it now is a very tight fit. The orientation of the pipe was also improved so that it now is exactly tangential to the inside diameter of the furnace. This was to help to produce a vortex. A proper cylindrical flint was formed from the refractory material to further the forming of the vortex. A bottom was added to the furnace as I had noticed some flames and heat escaping that way.
Much Heat About Nothing, or Fire Without a Casting
(Captain's log star date 16.7.2001)


Mean while had Jankke decided to speed up his project by buying some liquid iron from the Jokela foundry to be delivered to his on the spot prepared molds. Presto, instant wheels for your loco! While there Jankke was kind enough to pick up another 100 L of tempered green sand and some cast iron ingots that they produce there for some purpose. These are different stuff from that with the 4% carbon content iron we got last time. On the evening of 15th of July I prepared a two sided green sand mould from the plate pattern of a coupled driving wheel of my Tk3-loco. The following evening the crucible was charged with 5 kg of grey iron and at 18:00 sharp the fire of Mark IV furnace was lit. Instead of the old burning paper method I tried a new method of hanging a handheld propane torch on the mouth of the charged furnace, then opened the gas valve a bit or maybe a little more to ensure that blower would not blow the flame out. Then I turned the blower on and lifted the lid onto its place on top of furnace.
After a five minute warm up at gas pressure of about 0.4 bar I turned the gas on but this time I adjusted the gas flow so that (at the beginning of the melt when the furnace is not yet very hot) the flame started to blue a bit and then closed the feed to get an orange/yellowish flame. The flame extended about 10 - 15 cm tops from the exhaust. This was less that half of what it was with the previous configuration. The gas pressure was only 0.8 bar and I adjusted it a bit once in a while to keep it there (so much for the regulator regulating anything). After half anhour I could see, by peeping through the exhaust hole, that the iron had begun to melt. After 40 minutes it was white hot. I let it cook for 15 more minutes to be on the safe side, then I turned off the gas and the blower, lifted the heat shield (hey, stop, heat shield what is that? I'll come back to it later) and the lid. Lifted the crucible with tongs and lowered it to the shank. Then I plunged, stirred and skimmed it with a piece of plywood and then quickly poured it. The mould behaved a bit like a morning porridge when it starts to boil, bubbled and puffed, which made me jump back a bit.
Of Heat Shields...
The heat shield? While preparing for this melt I decided that working on top of a sand pile was really not the thing, especially as you could not leave the equipment there to wait for right moment and weather. And the right moment and weather in my life very seldom coincide. So I moved the whole set to under our 30 square meter terrace, which has ceiling underneath made of corrugated plastic. This of course does not sound like a ceiling for a foundry, considering +800 C degree exhaust flame pointing upwards from the furnace towards the ceiling only 1.5 meters away. So I improvised a heat shield that is nothing more that bent (over turned U-shaped) piece of scrap steel plate that I place over the exhaust. It works like a double ended chimney and it mixes the hot exhaust with ambient air. If, when the furnace is working at full blast, you try it by hand at about 1 meter above the furnace the air feels hardly warm at all, I would estimate 50 deg C tops.Results of the Finnish Jury i.e. Post Mortem of Melt 5
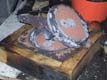
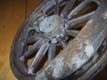
Back to melt 5 and its results. When the mould was opened a very strange casting was discovered. Both the riser and the runner had filled up, the riser was beautiful but the runner had a strange bubbly surface. The counter weight of the wheel situated right below the rises was hollow, and I mean hollow, not just a local shrinkage dimple. The axel and driving pin hub were also hollow. The spokes seemed to have run almost perfectly. After pondering an this failure a bit I remembered that I had sprinkled the sand a bit with water from a spray can because I felt that the sand had lost some of its wet contents in storage. This brought back very forcibly Terry Aspins words "Sand...too wet.. mould erupts like a miniature volcano...". Despite of the failure the wheel was partly machined and and the material proved to be pleasure to work with. To conclude, now I now thought I could melt 5 kg of iron with 5 kg of propane in about hour and produce machinable casting. Felt pretty good by now.
Finally We ARE Getting Somewhere... (Melt 6)
(Captain's log star date 20.7.2001)For the next melt on the 20th of July I prepared, on the previous evening, four molds and acquired 8 G-clamps because I thought that clamping would be better than weighting the frames and I had observed some alarming buffs of steam between the mould halves in the previous experiments. The melt progressed pretty much along the lines of the previous melt, this time it took 50 minutes for 6.5 kg charge to reach the state in which you cannot distinguish for the white heat the crucible from the rest of the inside of the furnace, which according to Terry (can I call him Terry?) is the indication of the pouring temperature for iron.
I turned off the furnace, lifted up the crucible and skimmed it and then poured the first mould. Disaster, I had forgot the clamps and the iron broke out between the mould halves. I put the half full/empty (I'm not sure if I'm an optimist or pessimist) back to the furnace and turned it on to keep it warm. I clamped the rest of the molds, and poured the second mould.
Then I recharged the crucible with 6 kg of iron scrap, which this time took 28 minutes to reach pouring temperature. Pouring of the two remaining moulds was, as they say, uneventful (though I must admit that the adrenalin shock you get every time you handle a crucible full of white hot iron is nothing like uneventful!).
More Disapointments and Some Success as recorded at the Post Mortem of Melt 6
Opening up the molds revealed that the first casting was spoiled, obviously, because a lot of the iron had escaped through the side, the second one was the best of the lot and may end up in my loco, but the numbers 3 and 4 were disappointments, especially as it had seem like these pours were the best of the lot when I poured them. They had not run properly and both had several broken spokes. Since number 2 was OK and was poured right out of the furnace without re-skimming and it succeeded I concluded that the skimming takes so much time that the small crucible and the iron in it cools too much. Actually I had been warned about this too in the feedback from the model-eng list. This time the gas consumption was 9 kg of propane for 13 kg of iron melted, not bad!In the Heat of the Night...the Perspiration Brakes Out (Melt 7)
Again four molds were prepared for the next melt, which took place on evening the 9th of August. This time I did not have time to prepare the molds on the previous night so the first 2 and 1/2 hours were spent in preparing the frames. It actually takes only about 20 minutes to prepare a single mould but I run out of tempered sand and had to do two of the frames twice because of inadequate rapping and subsequent problems in lifting the cope. I never seem to have problems with drag side; probably the ramming of the cope side provides enough rapping for the drag side.This time the first charge was 7.25 kg, the time from light up to first pour was 64 minutes. I did the first two molds without skimming the dross as way of experimenting, because Jankke had told me that at Jokela they did no skim the dross and indeed it had seemed to me wasteful as the dross was a single big lump and I could not see that it would cause any problems. And it did not, the molten iron run nicely from under the dross and no problem.
The second charge was 6.1 kg and took 46 minutes from light up to pour; some time was lost in skimming and plunging and then re-heating the metal. Moulds 3 and 4 poured okay although I did bungle a bit while pouring number 3, the pour was interrupted once or twice as my hand was not too steady. The thing that interfered with my pouring and has all the time been a nuisance is that the flint sticks to the bottom of the crucible and it is on the way when you handle it, besides adding unnecessary weight. I did as Ginger suggested and put some card board between flint and crucible but that only helped once and anyway it is impossible to use card board for the second melt as the card board is turned to ashes faster than you can insert it in the red hot furnace, if you manage to do that at all. Maybe next time I use a round asbestos disk (please do not tell me about the risks of asbesthos). This time I used a gas pressure of only 0.6 bar all through both melts. The melt time was somewhat longer than on previous occasion.
And We Have a Winner ... Post Mortem of Melt 7
After opening up the moulds (which involved pressure washing them at 2:00 AM more than half naked in the yard after having had trouble to get to sleep after the exiting evening), it was observed that skimming or not-skimming had no effect on the quality of the casting which seemed to have reasonable surface finish especially in the to-be-left as-cast surfaces which I had prepared with oil sand. Casting from mould 3 was spoiled, it had the kind of hollows that the casting from melt 4. Because all of the molds were prepared from the same batch of green sand I attributed this to the bungled up pour job. All other castings, while usable, showed marked shrinkage on the backside of the balance weight very close to the riser. One of the castings showed slight shrinkage in the hub area, near the runner. One spoke had minor run problem at the top (back) side. I attribute both of these to too small runner and riser. My runner was 15 mm and the riser only 10 mm in diameter. Next time I plan to increase both to 20 mm.Conclusion and Some After Math
The Mark IV burner now seems to burn about 5 kg of propane per hour with feed pressure of 0.6 bar. Theoretically this means 5 kg x 12 kWh/kg / 1 h -> 60 kW power. In his book "The Backyard Foundry" Terry describes a gas fired furnace that uses two 40 000 BUT/h burner, this converts to 23,4 kW power. Both sound reasonable as the torch I tried to copy for Mark I produces 89000 BTUs ie around 50kW.I wonder why the Mark I burner was such a failure? The air duct sizes were Mark IV 15 cm2, Mark I 64 cm2 and the gas inlet orifices Mark IV 3.0 mm, Mark I 1.5 mm. So I guess I had too much air not all of which contributed to heating and too little gas as the gas orifice was so small and my high pressure regulator back then only gave max pressure of 2 bar; remember that MarkII burner which has a comparable orifice to Mark I was used with full bottle pressure i.e. around 4 bar.
It now takes about one hour to melt 6 kg of iron this gives about 0.8 kg propane for 1 kg of melted iron or 10kWh / kg of melted iron. At 6 FIM/kg of propane the price of melting is around 5 FIM/kg (0.5 GBP, 0.8 USD), not including the capital investment and labour cost. I've been told that at Riihimäki foundry they charge 30 FIM/kg for this type of one of casting job. It is obvious that, if you only need the casting and care about the cost or don't care for the excitement and glory, a commercial foundry is the way to go. Or better yet go for the 'Jankke Way' i.e. prepare your own molds and borrow some liquid iron!
As it theoretically takes only about 0.24 kWh to melt 1 kg of iron, an induction oven could presumambly melt 1 kg for nothing (at 0.48 FIM/kWh nothing is around 0.10 FIM/0.01 GBP/0.015 USD). Now where is that hi-freq inverter and the copper coil I stoved away...I knew they would come handy someday...
From conception to delivery it has taken me some three years but the effective play time has been a lot less. The manufacturing of the furnace took some 4 hours, all the different burners altogether have taken some 4 hours, the final Mark III/IV only about 1/2 hour, not including the 1/2 day spent in acquiring the parts. Some 5 hours has been used to make the moulding boxes (frames realy). Say a grand total for the furnace and equipment all included except the time spent dreaming about it around 21 h or litle less than three working days. The seven melt and pour attempts sums up to about 27 hours or litle more than four working days. So all in all about one man week to produce four usable wheels. I call that not-so-bad, and I'll do better in the future. For the fun I guess that beats a week in the office anytime!
Below is a rough break down of the capital investment:
| An empty 33 kg botlle | FIM 250,- |
| Face shield | FIM 200,- |
| Pair of Gloves | FIM 300,- |
| Leather appron | FIM 200,- |
| Crucible | FIM 400,- |
| Refratory lining | FIM 300,- |
| Oil Sand | FIM 150,- |
| Gas tubing | FIM 120,- |
| 2x33 kg propane | FIM 400,- |
| Sundries FeSi, 60 L green sand, Si, parting sand, 40 kg iron | FIM 200,- |
| Buckets etc | FIM 100,- |
| 60 L green sand, 40 kg iron | FIM 300,- |
| Old truck air blower | FIM 40,- |
A total of about 3000 FIM (330 GBP/500 USD)
Of Safety - a Risk Assesment
Casting (especially iron) is a very hazardous activity and I by no means want to encourage anybody to follow my footsteps.As evidenced by this narrative and the accompanying images, my set up illustrates many dangerous practices that should be avoided. First of all, this type of furnace where you are forced to lift the crucible up brings the white hot stuff very close to the yours knees. A slip and there you are... The Gingery type of furnace is much safer in that respect and also in the handling of the white hot furnace lid. Secondly the gas feed should be done with proper all metal piping instead of the rubber hose I'm using. If the molten metal is spilled on the foundry floor then there is every risk that it will burn through the rubber of the hose and there you are again... I also would be happier if the ceiling of my 'foundry' were much higher and of non-flamable material. The wrapper of my furnace is zinc coated which probably evaporates something unhealthy. Being outdoors the foundry floor may get wet and when casting there will invitably be spils: water and molten iron spell explosion very easily. The above is by no means a conclusive risk assesment; if you go for this kind of activity you should do your own risk assesment and act accordingly. After all it is your funeral...
(In my opinion anyone contemplating to set up a home foundry would do well to acquire both Terry's books, "Foundry Work for the Amateur" and "The Backyard foundry", I would also get a copy of Ginger's "Crucible Furnace".)
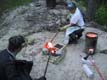
As a closing note have a look at the crucible that exploded on the evening 30th of July -01.

I was in a bit of a hurry and I just fast forwarded, although at the back of my mind there was this thought that "I'm just in that part of my learning curve where I'm too confident but yet too unexperienced so that accidents are likely to happen" . I set everything up very quickly and turned on the gas (at full blow to speed up the things, mind you). After about two minutes there was a hell of a BANG inside the furnace. I turned off the gass immediatelly and dismanteled the furnace. The picture tells the story. I immediatelly realised that what had happened was that the crucible had been left outdoors and it had rained some days previously. Although the literature warns about this, especially with graphite crucible, I had not bothered to warm it up gently to allow the moisture to evaporate, insteade I exploded it!
Kusti 11.8.2001